📋 The Least You Need to Know: Chest Positioning and Evaluation
Authors: Breanna Doescher, R.T.(R)(CT)(ARRT) and Roger Wu, MD
Last Reviewed: August 2026
Text: Radiography Essentials for Limited Practice, 7th Ed. (Frank & Ehrlich)
⏱️ Estimated Time: 2 hours
- Assigned Reading — 60 minutes
- Module — 50 minutes
- Competency Check — 15 minutes
🎯 Objectives
By the end of this module you will be able to:
- Position each of the six chest procedures Michigan authorizes under limited diagnostic radiography — PA upright, AP supine, lateral upright, lateral decubitus, AP lordotic, and obliques
- Select the projection that matches the order, the approved facility protocol, your documented competency, and the patient's condition
- Evaluate a chest image using the I-A-P-E-S sequence and name the specific step that failed
- Distinguish rotation, incomplete inspiration, scapular superimposition, clipped anatomy, and motion from each other and from an exposure problem
- Determine whether an imperfect chest image meets technical acceptance criteria, requires a justified repeat, or must be held and escalated when the patient cannot safely achieve the ordered projection
📖 Assigned Reading
Radiography Essentials for Limited Scope, 7th Ed., Ch. 16 (Bony Thorax, Chest, and Abdomen) and Ch. 19 (Image Evaluation), pp. 300-328, 373-388
Read for: how the text sets up each chest projection, what it lists as the evaluation criteria for an acceptable PA and lateral chest, and how it separates a positioning failure from an exposure failure.
🩻 The Setup
Two chest images are on your monitor. Both are adequately exposed, both are sharp, both include the required anatomy. On one, the medial ends of the clavicles sit at equal distances from the thoracic spine; on the other, they clearly do not.
The second image is rotated, and rotation is a positioning failure — no exposure adjustment will correct it.
Rotation can distort the mediastinum and change the apparent size of the heart the provider is trying to assess. Whether it requires a repeat depends on how much rotation, what the examination was ordered to answer, and your facility's acceptance criteria.
Read the assigned pages now, then come back.
🧭 The Concept, Plainly: Routine Is Not the Same as Forgiving
A technically acceptable chest image demonstrates complete anatomy, adequate inspiration, correct alignment, appropriate receptor exposure, and no motion. Five things, every time, on the study you perform more than any other.
Your job is to recognize the failure, not to repeat everything imperfect. A repeat is a second dose. The question is never whether the image matches a textbook plate — it is whether the interpreting provider can answer the clinical question.
The terms this module uses. These appear on every chest image you evaluate.
- Apices — the uppermost region of the lungs, above the clavicles
- Costophrenic angles — the inferior lateral corners where the diaphragm meets the chest wall, and where a small pleural effusion collects first
- Rotation — the thorax not square to the receptor, seen as asymmetry of the medial clavicular ends relative to the spine
- Decubitus — the patient lying down with a horizontal beam, which is what makes air and fluid levels visible
- Upright — vertical, standing or safely seated; the patient does not have to stand for a projection to be upright
Why PA rather than AP for the routine upright chest. In a PA projection the heart is closer to the receptor, so it is magnified less and its size is truer. That is the projection logic from Module 2 applied to the structure the provider most often needs measured.
🚫 Scope Boundary
Michigan's limited scope authorizes six chest procedures (R 333.5210(2)(c)).
- Authorized chest projections — PA upright, AP supine, lateral upright, lateral decubitus, AP lordotic, obliques
Your program teaches these six because R 333.5212(3) requires examination-specific instruction matching the qualification: a limited chest program teaches chest procedures. Your authority is the intersection of that list, your documented competency, the order, and approved facility protocol.
⚖️ AP upright is not expressly listed. The rule names lateral upright and AP supine separately, so it distinguishes projection from patient position deliberately. It does not name AP upright or AP erect. Work from the narrower reading: a safely seated patient facing the upright receptor is receiving a PA upright, which is listed. Do not treat AP upright-in-bed as automatically authorized, and ask your supervising practitioner and facility to document which reading your qualification rests on.
The following are not chest examinations, regardless of what may appear on a chest image: ribs, sternum, sternoclavicular joints, soft-tissue neck or airway, and abdomen.
Scope is procedure-based, not pixel-based — the principle from Module 1 applies here in a specific way. Including the diaphragms and costophrenic angles will ordinarily place a small portion of the upper abdomen on the image, and that is correct collimation for a chest. Deliberately widening the field to "grab the upper abdomen while we're here" is an abdominal examination you are not authorized to perform.
⚕️ Beyond your scope: the line and tube check. An ordered chest radiograph for line or tube placement is still a chest examination. You include the required device course and the relevant anatomy, and you evaluate technical quality — the licensed practitioner determines whether the device is clinically positioned correctly.
Substituting a projection is a provider decision, not an operator convenience. If the patient cannot safely achieve the ordered projection, you protect the patient, follow the approved adaptation protocol, and consult the supervising practitioner when the protocol does not resolve it. You do not quietly perform an AP because the PA is inconvenient, and you do not add a lordotic, decubitus, or oblique because you think it might help.
📐 Positioning Sequence: The Six Authorized Chest Projections
Every procedure below uses the same seven elements in the same order.
Do it in this order, every procedure:
- Verify — two patient identifiers, the examination ordered, the clinical indication, and any specified side or position
- Assess — mobility, breathing ability, pain, fall risk, and medical devices, before the patient moves
- Explain — the procedure and the breathing instruction, rehearsed rather than shouted at the moment of exposure
- Prepare — remove removable artifacts when safe and permitted, and apply facility shielding policy
- Position — patient, part, receptor, and central ray
- Mark — radiopaque side marker in the field before the exposure
- Expose — from behind the protective barrier, on the correct phase of respiration
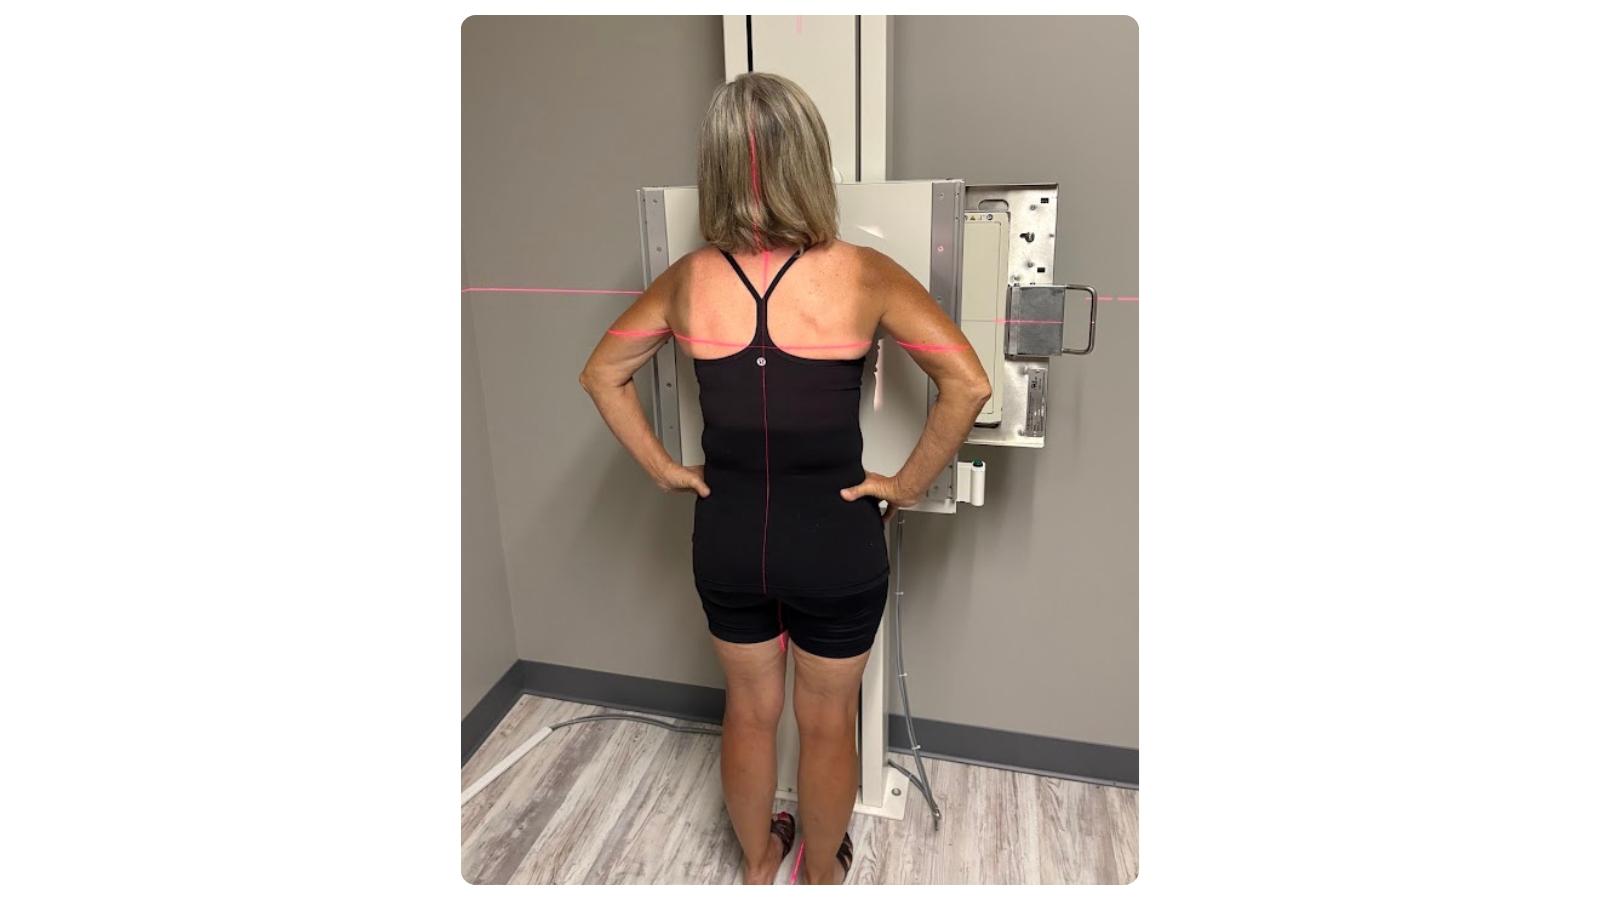
PA Upright Chest
- Setup: Position the patient upright facing the receptor with the chin raised. Center the body to the receptor, place hands on hip, and roll the shoulders forward and down to move the scapulae away from the lungs.
- SID: 72"
- Central ray: Perpendicular to T7, at about the level of the inferior angles of the scapulae.
- Collimation: Include the entire lungs from the apices through both costophrenic angles and the lateral chest margins.
- Respiration: Suspend breathing on full inspiration, usually on the second deep breath.
- Image check: The chest is not rotated, the lungs are fully expanded, the scapulae are mostly outside the lung fields, and the apices and costophrenic angles are included.
- Common limitation: If the shoulders are not rolled forward and down, the scapulae may remain over the lung fields.
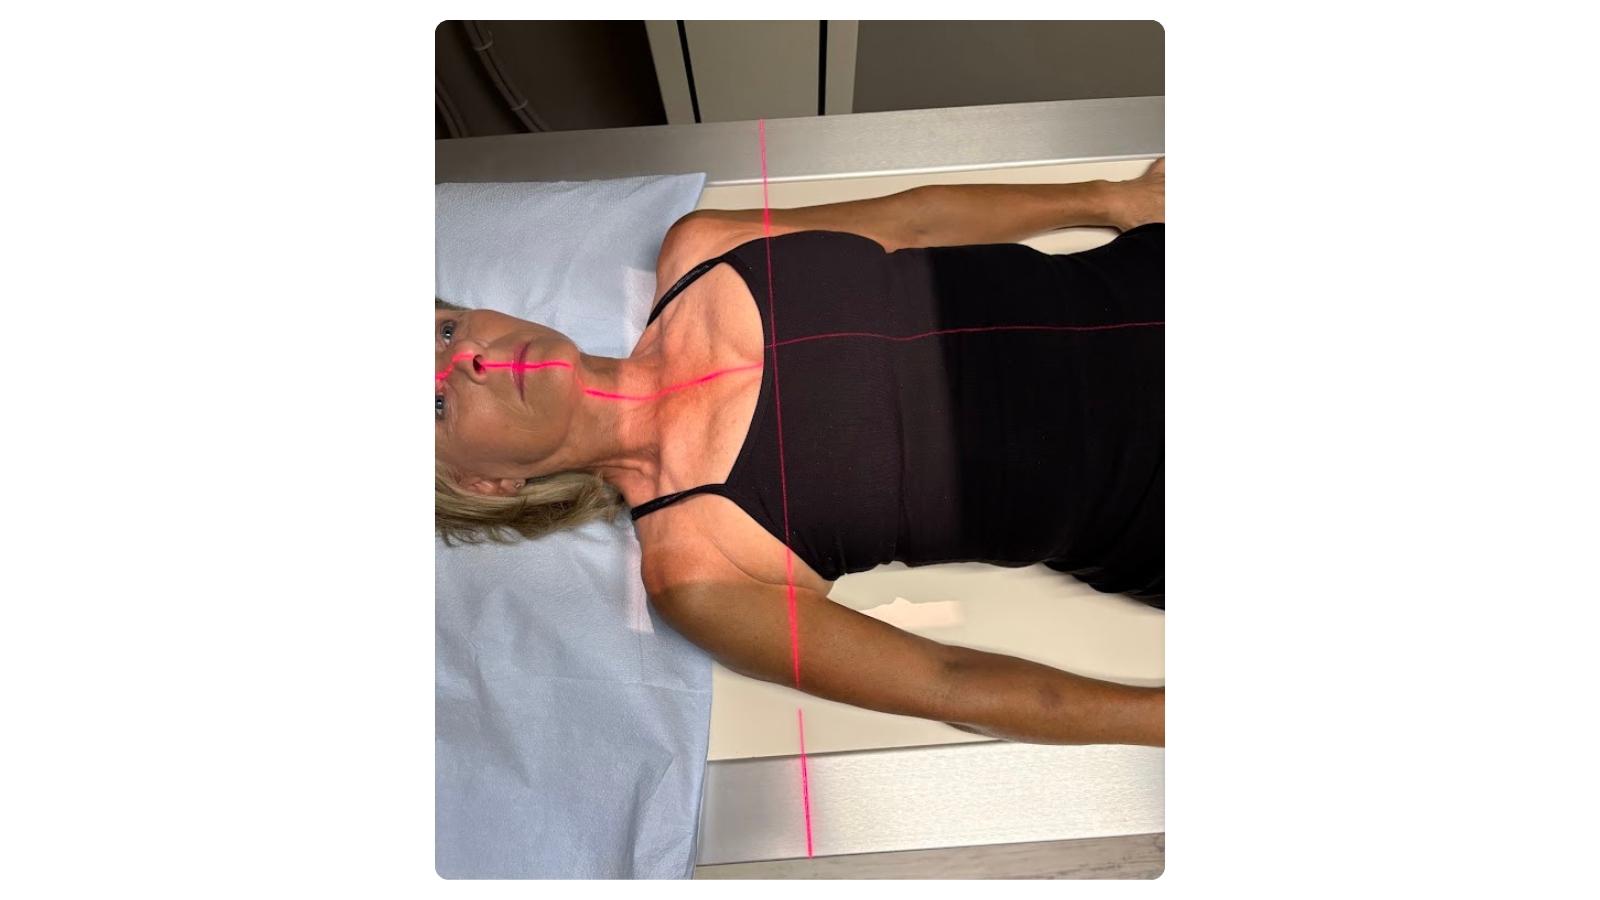
AP Supine Chest
- Setup: Position the patient supine with the body centered to the receptor. Keep the shoulders even, the head straight, and the chin raise out of the lung apices.
- SID: 40-48"
- Central ray: Direct the beam perpendicular to the receptor, centered to the midline of the chest at T7, about 3-4" below the jugular notch.
- Collimation: Include the entire lungs from the apices through both costophrenic angles and the lateral chest margins.
- Respiration: Suspend breathing on full inspiration, usually on the second deep breath.
- Image check: The chest is not rotated, both lungs are included, and the apices and costophrenic angles are demonstrated.
- Common limitation: A shallow inspiration can make the lungs appear crowded and the diaphragm appear higher.
- Markers: Anatomic side marker and supine annotation required, because the evaluation criteria differ from a PA Chest.
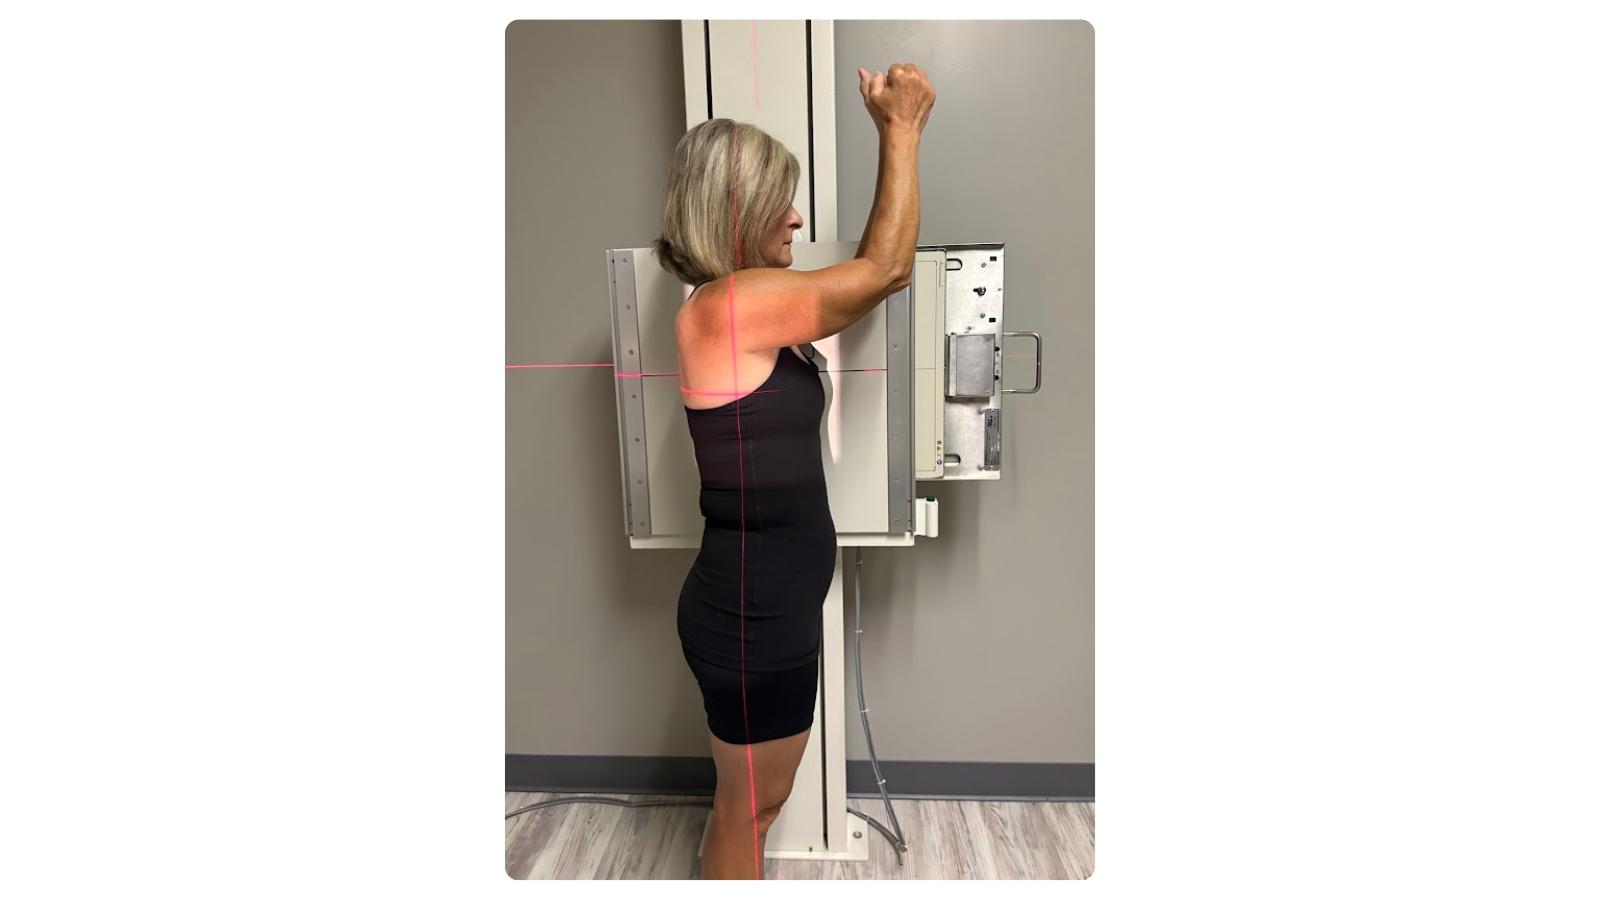
Lateral Upright Chest
- Setup: Position the patient upright with the left side against the receptor. Raise both arms above the head and keep the chin elevated. Keep the shoulders and the hips straight so the chest is not rotated.
- SID: 72"
- Central ray: Perpendicular to the mid-thorax at the level of T7.
- Collimation: Include the entire lungs from the apices through both costophrenic angles, including the anterior and posterior chest margins.
- Respiration: Suspend breathing on full inspiration, usually on the second deep breath.
- Image check: The posterior ribs are nearly superimposed, the arms are clear of the lungs, and the apices and costophrenic angles are included.
- Common limitation: If the patient is rotated, the posterior ribs will not be superimposed, and the chest will not appear truly lateral.
- Markers: Anatomic side marker indicating the side against the receptor.
Lateral Decubitus Chest
- Setup: Patient lying on the ordered side, elevated on a firm radiolucent pad so the dependent side is not cut off by the table edge, arms raised above the head. Keep the chest against the receptor and use a horizontal x-ray beam. Hold patient in position for approximately 5 minutes before exposure so fluid can layer or air can rise.
- SID: 72"
- Central ray: Direct the horizontal beam to T7; the horizontal beam is what makes the level visible.
- Collimation: Include the entire lungs from the apices through both costophrenic angles and the lateral chest margins.
- Respiration: Suspend breathing on full inspiration, usually on second deep breath.
- Image check: The chest is not rotated, both lungs are included, and the horizontal beam demonstrates any air or fluid layering.
- Common limitation: If the patient is not kept truly on their side, the chest can rotate and air or fluid may not layer correctly.
- Markers: Anatomic side marker plus a decubitus marker identifying the dependent side.
AP Lordotic Chest
- Setup: Position the patient upright facing away from the receptor. Have the patient stand about 1 foot in front of the receptor and lean backward until the shoulders touch it. Keep the body straight with the hands on the hips.
- SID: 72"
- Central ray: Perpendicular to the receptor at mid-sternum for the leaning position, or 15–20° cephalad for the angled variation if the patient cannot lean.
- Collimation: Include the entire lungs, especially both lung apices, and both lateral chest margins.
- Respiration: Suspend breathing on full inspiration, usually on second deep breath.
- Image check: The clavicles are projected above the lung apices, the apices are clearly visible, and the chest is not rotated.
- Common limitation: If the patient does not lean back enough, the clavicles may remain over the lung apices.
- Markers: Anatomic side marker; lordotic annotation per facility policy.
Chest Obliques (RAO / LAO)
- Setup: Position the patient upright facing the receptor. Rotate the body about 45° from the PA position into the ordered oblique position. The arm away from the receptor raised clear of the chest, and the arm nearest the receptor down with the hand on the hip. The lung farther from the receptor is the one demonstrated, so RAO demonstrates the left lung and LAO the right lung.
- SID: 72"
- Central ray: Perpendicular to T7
- Collimation: Include the entire lungs from the apices through both costophrenic angles and the lateral chest margins.
- Respiration: Suspend breathing on full inspiration, usually on second deep breath.
- Image check: The patient is rotated about 45 degrees, both lungs are included, and the apices and costophrenic angles are demonstrated.
- Common limitation: Too much or too little rotation changes the appearance of the lungs and prevents a proper oblique view.
- Markers: Anatomic side marker plus the named oblique position.
⚕️ Beyond your scope: which oblique, and how far. Degree of obliquity and side are set by the order or the written protocol, not chosen at the console. Perform the oblique that was specifically ordered, and never improvise one as a substitute for a routine projection.
🎛️ Technique Factors
⚠️ Use your facility's approved technique chart. The values below are teaching ranges only. kVp, mAs, AEC chamber selection, and grid ratio depend on your equipment, detector system, patient size, and facility protocol.
- PA upright — kVp 110–125, mAs 1–3, SID 72", grid per facility receptor setup
- Lateral upright — kVp 110–125, mAs 3–6, SID 72", grid per facility receptor setup
- AP supine — kVp 80–100, mAs per facility chart, SID 40–48", grid per facility protocol
- Lateral decubitus — kVp 110–125, mAs 2–4, SID 72", grid per facility receptor setup
- AP lordotic — kVp 110–125, mAs 2–4, SID 72", grid per facility receptor setup
- Chest obliques — kVp 110–125, mAs 2–4, SID 72", grid per facility receptor setup
Adjust when:
- Large body habitus → increase per the facility chart; verify AEC chamber selection matches the projection before assuming technique is the problem
- Patient cannot suspend respiration → use the shortest practical exposure time permitted by the approved technique chart while maintaining appropriate receptor exposure
- AEC chambers partially covered by an arm, device, or shield → the selected chamber may produce an incorrect exposure; clear the chamber or switch to an approved manual technique per facility protocol
☢️ High kVp is deliberate on the chest. It penetrates the mediastinum, keeps the exposure short enough to reduce cardiac motion, and lowers patient dose relative to a low-kVp, high-mAs equivalent.
🖼️ Image Evaluation Criteria
Run I-A-P-E-S in order — Identification, Anatomy, Positioning, Exposure, Sharpness — the sequence from Module 6. On the chest, Positioning and inspiration fail most often and matter most.
A diagnostic PA chest demonstrates:
- Both apices and both costophrenic angles within the collimated field — the angle is exactly where a small effusion collects, so clipping it removes the finding the examination was ordered for
- Medial clavicular ends approximately symmetric about the thoracic spine — the fastest rotation check available to you
- Scapulae projected clear of the lung fields — obtained by rolling the shoulders forward, not by exposure
- Lung expansion consistent with full inspiration — roughly 9–10 posterior ribs above the diaphragm in a cooperative adult, as a guide rather than a pass/fail count
- The thoracic spine faintly visible through the heart shadow; exposure indicator within the facility's expected range — adequate penetration without gross saturation or excessive noise
- Sharp pulmonary markings, diaphragm, and heart borders — no motion blur
Positioning is off if:
- One medial clavicular end sits closer to the spine than the other → the thorax was not squared to the receptor — rotation, a Positioning failure
- Fewer posterior ribs are visible than expected, diaphragms elevated, basilar markings crowded → the patient did not hold a full inspiration, which can mimic or hide infiltrate
- Scapular borders overlie the lateral lung fields on a PA → the shoulders were not rolled far enough forward
- An apex or a costophrenic angle is missing → receptor height, orientation, centering, or collimation, not exposure
- Pulmonary markings, ribs, or diaphragm are blurred → breathing, body movement, inadequate support, or an unnecessarily long exposure time
Do not carry the PA criteria unchanged onto an AP supine image. Expect more cardiac magnification, a shallower inspiration, and scapulae that cannot be fully cleared. That is the accepted compromise of the projection, not an error you introduced — which is why the supine annotation matters.
🔁 Repeat or Accept
Repeat:
- A costophrenic angle or an apex is outside the field, and the missing region is required → the examination cannot answer the question it was ordered to answer
- Rotation sufficient to distort the mediastinum or cardiac silhouette on a study ordered to assess them → the measurement the provider needs is wrong, not just imperfect
- Inspiration inadequate for the requested examination, where a better breath is safely achievable → crowded basilar markings can hide or imitate the finding, and the patient can fix it
- Motion obscuring required detail, where clearer instruction, safe support, or a shorter exposure time would reduce it → the correction is available, so the first image is a preventable non-diagnostic exposure
Accept:
- Slight clavicular asymmetry on a study ordered for a different question → a repeat adds dose without changing what the provider concludes
- Scapulae partially overlying the lungs in a patient with limited shoulder mobility → the position is not achievable, so the second exposure produces the same image
- Reduced inspiration in a patient in pain, in respiratory distress, or unable to cooperate → the limiting factor is the patient's condition, and repeating will not change it — document the limitation instead
- Any image that answers the clinical question but does not match a textbook plate → "more perfect" is not a diagnostic category
Before any repeat, name the cause and correct it. Re-shooting a rotated image with more mAs produces a darker rotated image. Repeat only when the image is not diagnostically acceptable, the cause can reasonably be corrected, and the repeat is authorized under facility policy.
When the patient's condition — not your positioning — is the limit, stop, document the limitation, and escalate rather than making repeated unsuccessful exposures.
⚠️ Where This Goes Wrong
- Coaching the breath without verifying it. "Big breath, hold it" said out loud is not the same as a chest that is actually inflated. Confirm inspiration on the image, not on the instruction you gave.
- Trying to correct rotation with exposure factors. Rotation is a positioning error. Changing kVp or mAs changes receptor exposure and does nothing to square the patient's thorax.
- Treating limited inspiration as an exposure problem. Crowded basilar markings pull you toward "add mAs." Increasing exposure cannot expand a lung.
- Substituting AP supine for the ordered PA because it is faster. This is the competent operator's error — the patient is uncomfortable, the department is busy, and supine is easier. Changing the projection changes what the provider is reading, and that is a clinical decision that belongs to them.
- Widening the field to include the upper abdomen "while we're here." The abdomen is not on your list and a chest order does not extend it. Correct collimation for a chest already includes what a chest requires.
- Rushing the highest-volume examination. Chest is where speed pressure is worst and where subtle rotation is most likely to pass. Routine is not the same as forgiving.
Why this matters: the rule states its own reasoning. R 333.5201 provides that improper performance of medical radiologic technology results in unnecessary exposure and unnecessary re-administration of radiation, and that operator qualification therefore directly affects the patient's radiation burden. On the chest, that is not abstract — it is the study you perform most often.
💬 Words That Work
Three conversations decide whether a chest study goes right: the breath, the repeat, and the order you cannot perform.
Coaching the breath — the single most important chest instruction:
“When I say so, take the biggest breath you can, all the way in — and hold it. Don't let any out until I tell you. Ready… all the way in… and hold.”
Explaining a repeat for a shallow breath:
“That first one didn't show your lungs as fully as I need. That's on the instructions, not on you. Let's do one more, and this time fill up as far as you comfortably can and hold it until I say.”
Rolling the shoulders forward on a PA:
“Roll your shoulders forward and down, like you're slouching on purpose, and rest the backs of your hands on your hips. I know it feels strange — it moves your shoulder blades out of the picture.”
Declining an order you are not authorized to perform or a position the patient cannot safely achieve:
“I've got the order for the upright chest, but she isn't safe standing or sitting for it. I can do an AP supine if you want to change the order, or I can wait — I just don't want to swap the projection on you without telling you, because it'll look different than what you're expecting.”
When the patient asks what the image shows:
“I can see the image, but reading it isn't my role — that's your provider's job, and they'll go over it with you. What I can tell you is the images came out well and they're on their way over.”
📝 Document It
- Record the projection and patient position actually performed — an AP supine performed in place of an ordered PA upright is documented as what it was, along with who authorized the change
- Record any limitation or deviation — inability to raise the arms, inability to achieve full inspiration, devices that could not be moved, or anatomy that could not be included
- Place the radiopaque anatomic side marker in the field at the time of exposure — a later electronic L or R annotation is not a routine substitute for a missing marker
- Add the position annotation where the projection requires it — upright, supine, or decubitus with the dependent side identified
- Maintain the clinical competency record for each chest projection — the exact projection performed, whether it involved a patient or approved simulation, the date, the evaluator, the level of assistance, the technical evaluation findings, any corrective action, and the outcome
- Confirm the supervision requirement was met for the exposure — students applying radiation under the approved-program exemption require direct supervision by a licensed practitioner or a Part 5–qualified medical radiologic technologist (R 333.5209(2)(a))
✍️ Demonstrable Skills for Sign-Off
☐ Positions and exposes a diagnostic PA and lateral upright chest, with correct marker placement before exposure
☐ Adapts the examination safely for a patient who cannot stand, and states what was changed and who authorized it
☐ Sets up a lateral decubitus with a horizontal beam and correctly identifies the dependent side for a stated indication
☐ Coaches and verifies a full inspiration, then confirms lung expansion on the resulting image
☐ Evaluates a set of chest images using I-A-P-E-S and names the specific failed step and its cause on each
☐ Makes and justifies a repeat-or-accept decision on a technically imperfect image without an unnecessary exposure